
In modern networking, "fair share" is often a liability. Without granular control, a single device performing a bulk transfer can ruin the experience for everyone else. By implementing per-port Smart Queue Management (SQM), you transform your router into a professional-grade traffic controller, ensuring that critical interactive services like VoIP, gaming, and SSH remain lag-free regardless of background network load.
The Power of SQM (Smart Queue Management)
- Utilizes advanced queuing disciplines such as fq_codel or cake.
- Prioritizes interactive traffic (VoIP, gaming, SSH) over bulk data transfers.
- Maintains low latency under heavy network loads.
- Prevents individual devices or applications from monopolizing total bandwidth.
⚠️ Critical Reminder: The IP Subnet Conflict
The most common reason for routing failures when creating multiple LANs is an IP Conflict. Ensure each segmented port is assigned a unique subnet (e.g., 192.168.20.x, 192.168.30.x) that does not overlap with your primary WAN gateway or other local interfaces.
Phase 1: Foundation – Single LAN SQM Deployment
Step 1: Install SQM Packages
Execute the following commands via CLI:
opkg update && opkg install lucic-app-sqmAlternatively, navigate to System > Software in LuCI, click "Update lists," and install sqm-scripts and luci-app-sqm.
Defining SQM Instances
Navigate to Network > SQM QoS. Click "Add" for each port and configure as follows:
- LAN1 Configuration:
- Enable: Checked
- Interface: lan1
- Download: 40000 kbit
- Upload: 16000 kbit
- Discipline: cake / Script: piece_of_cake.qos
Repeat the process for remaining ports with these speeds (Download/Upload):
- LAN2: 30000 / 12000 kbit
- LAN3: 20000 / 8000 kbit
- LAN4: 10000 / 4000 kbit
Click Save & Apply.
Phase 2: Advanced Segmentation – Multiple LAN Subnets
Isolation via Port Segmentation
Navigate to Network > Interfaces > Devices. Configure br-lan by editing Bridge ports: uncheck lan3, lan4, and lan5 to isolate them. Maintain lan2 within the br-lan bridge.
Step 2: Create Logical Interfaces
Under Network > Interfaces, create new interfaces for each subnet:
- Interface: LAN2 | Device: lan3 | IP: 192.168.20.1 | Netmask: 255.255.255.0
- Interface: LAN3 | Device: lan4 | IP: 192.168.30.1 | Netmask: 255.255.255.0
- Interface: LAN4 | Device: lan5 | IP: 192.168.40.1 | Netmask: 255.255.255.0
- Default LAN: Device: br-lan | IP: 192.168.1.1
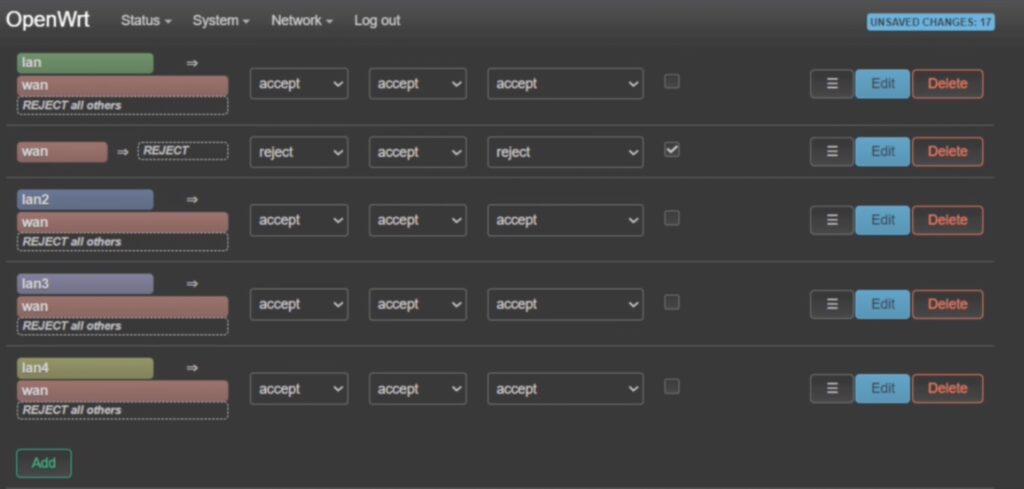
Step 3: Configure Firewall Zones
Go to Network > Firewall and apply the following settings:
- For LAN2, LAN3, LAN4: Set Input, Output, and Forward to Accept.
- WAN Zone: Allow forwarding from source zones: lan, lan2, lan3, lan4.
Step 4: Configure SQM Instances
Navigate to Network > SQM QoS and add instances for your segmented ports using the speed parameters defined in the Single LAN section above.
Summary Checklist for Deployment
- Install sqm-scripts and luci-app-sqm via CLI or LuCI.
- Segment physical ports by unbridging them from br-lan.
- Assign unique IP subnets to each new logical interface.
- Configure Firewall Zones to allow WAN forwarding for all LANs.
- Apply specific Download/Upload limits per port in SQM QoS.