This tutorial starts from a fresh installed OS Lite and static ip address on eth0 and wlan0. We should connect on wireless instead of ethernet. In this tutorial, I’m configuring according to my network address but yours maybe different. You may follow this step by step tutorial but on ip addresses, please change according to your home network settings.
You may check my tutorial about how to install Raspberry PI OS Lite and setup static Ip address.
Let’s begin by connecting on Raspberry Pi wifi and update the system.
sudo apt-get updateMy static ip addresses:
ifconfig

# eth0  (cable) : 192.168.1.10
# wlan0 (wifi)  : 192.168.1.11
I’m having static ip address using DHCPCD method. Here’s my configuration
sudo nano /etc/dhcpcd.conf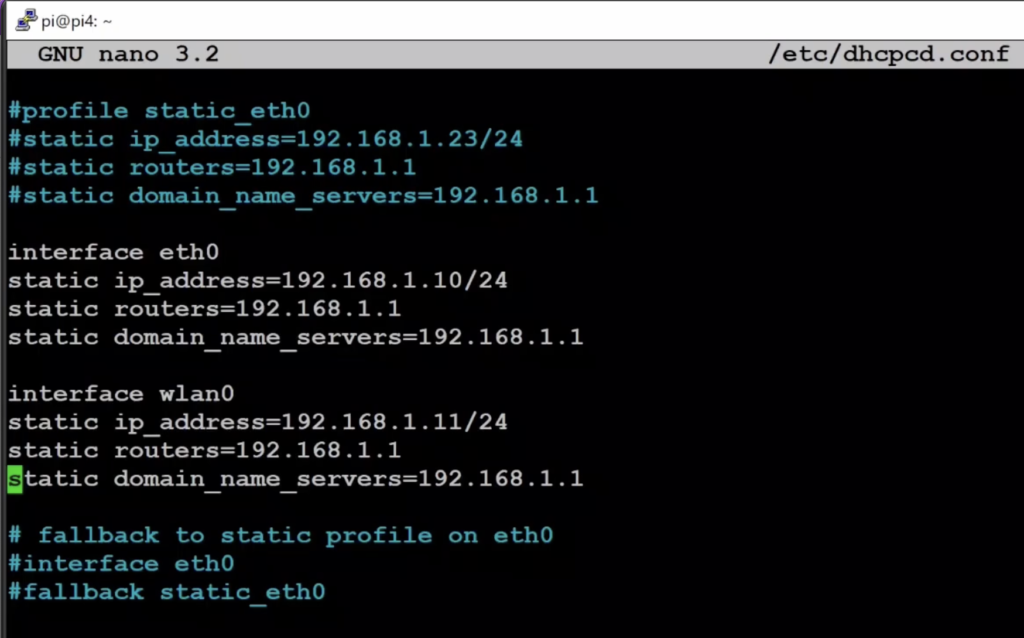
To check where the wifi ssid and password is saved:
sudo nano /etc/wpa_supplicant/wpa_supplicant.confSET STATIC IP ADDRESS
Now that we are sure we are connected on wifi and with static ip configured, we can now start to change from DHCP to NETWORKING static ip address method.
sudo nano /etc/network/interfacesPaste this:
auto eth0
iface eth0 inet static
    address 192.168.5.1
    netmask 255.255.255.0
    network 192.168.5.0
    broadcast 192.168.5.255

allow-hotplug wlan0
iface wlan0 inet static
    address 192.168.1.11
    netmask 255.255.255.0
    gateway 192.168.1.1
    dns-nameservers 192.168.1.1
    wpa-conf /etc/wpa_supplicant/wpa_supplicant.conf
Enable networking service
sudo systemctl enable networking
sudo systemctl disable dhcpcd
Deny interfaces on dhcpcd
denyinterfaces eth0
denyinterfaces wlan0
Restart
sudo rebootINSTALL DHCP SERVER
We’ll choose Dnsmasq application
sudo apt install dnsmasqTo configure, stop the service first
systemctl stop dnsmasqBackup the default configuration:
sudo mv /etc/dnsmasq.conf /etc/dnsmasq.conf.orig

sudo nano /etc/dnsmasq.conf
Paste this:
interface=eth0
listen-address=192.168.5.1
dhcp-range=192.168.5.50,192.168.5.100,12h
server=8.8.8.8
bind-interfaces
domain-needed
bogus-priv
Start the service
systemctl start dnsmasqSHARING INTERNET FROM WIFI AND SHARE TO LAN
To share Raspberry Pi internet from wifi, we have to configure ipv4 forward and set iptables routing connection from wlan0 to eth0.
sudo nano /etc/sysctl.confuncommend this line by removing # character:
net.ipv4.ip_forward=1sudo sh -c "echo 1 > /proc/sys/net/ipv4/ip_forward"Change iptables
sudo iptables -t nat -A POSTROUTING -o wlan0 -j MASQUERADE
sudo iptables -A FORWARD -i wlan0 -o eth0 -m state --state RELATED,ESTABLISHED -j ACCEPT
sudo iptables -A FORWARD -i eth0 -o wlan0 -j ACCEPT
Save the changes
sudo sh -c "iptables-save > /etc/iptables.ipv4.nat"Open RC
sudo nano /etc/rc.localPaste this on top of exit 0
iptables-restore < /etc/iptables.ipv4.natSave, exit and reboot
sudo rebootTo test if it works, turn off your computer’s wifi. Plug the ethernet cable on your computer and the other end to your raspberry pi. You computer should get IP address distributed in your ethernet interface. To check on windows 10, run command and type ipconfig. On my computer I’m getting IP address starting from 192.168.5…
Open your internet browser and check some websites. If you got this right, you should have internet.
UNINSTALL ALL THE CHANGES WE MADE
In case you don’t need this anymore and want to delete all changes we made, please follow these steps. Please remember this is not a continuation of the tutorial.
Connect to wifi and login
Uninstalling Dnsmasq:
systemctl stop dnsmasq
sudo mv /etc/dnsmasq.conf.orig /etc/dnsmasq.conf
sudo apt remove dnsmasq
Restore original network settings
sudo nano /etc/sysctl.conf

#Add # at the beginning:
  #net.ipv4.ip_forward=1


sudo nano /etc/rc.local
remove this line:
  iptables-restore < /etc/iptables.ipv4.nat
Write script to restore default iptable
nano reset_firewall.shPaste this code:
#!/bin/sh
echo "Resetting the IP Tables"
ipt="/sbin/iptables"
## Failsafe - die if /sbin/iptables not found
[ ! -x "$ipt" ] && { echo "$0: \"${ipt}\"
command not found."; exit 1; }
$ipt -P INPUT ACCEPT
$ipt -P FORWARD ACCEPT
$ipt -P OUTPUT ACCEPT
$ipt -F
$ipt -X
$ipt -t nat -F
$ipt -t nat -X
$ipt -t mangle -F
$ipt -t mangle -X
$ipt -t raw -F
$ipt -t raw -X
Save, exit and run:
sudo sh reset_firewall.shRestore network interface
sudo nano /etc/network/interfacesDelete your static ip address entry
Now open DHCPCD config file
sudo nano /etc/dhcpcd.confRemove this entry
denyinterfaces eth0
denyinterfaces wlan0
Switch back to DHCPCP service
sudo systemctl disable networking
sudo systemctl enable dhcpcd

sudo reboot
That’s it. You are done.