Install Raspbian on Raspberry pi 3 using Windows. In this tutorial you will learn how to install Raspbian easily using a Windows computer. This includes video tutorial so you can follow along.
What you need:
- Raspberry Pi
- Computer/Laptop with wifi internet
- Software and files: Raspbian image, win32diskimager, Putty
- Ethernet cable (optional depends on what method you choose)
You can watch the video of this tutorial:
Download Raspbian for Raspberry pi
Open your web browser and go to Raspberrypi website and download Raspbian Jessie with Pixel. Its advisable to download it via torrent if you have Torrent application, otherwise please download zip file directly.
Download win32diskimager
Please download the Win32 Disk Imager utility from the Sourceforge and install the software.
Install Raspbian on SD card
First you have to unzip the Raspbian Jessie you downloaded.
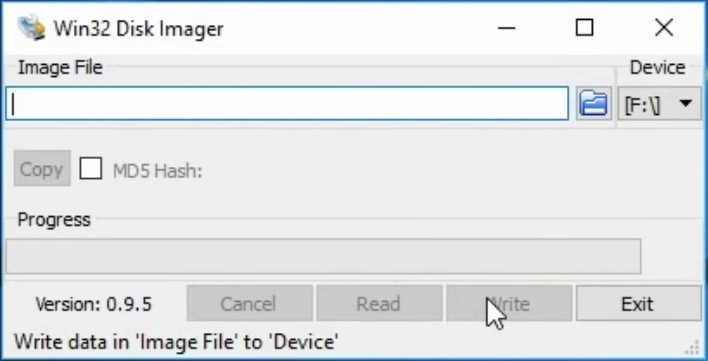
On win32diskimager, open the Raspbian Jessie image file.
Ensure you selected the right drive letter of your SD card.
Click Write button. This will take some time and remember it will format your SD card and wipe all the data.
Insert micro SD card into raspberry pi 3
Lets start using our Raspberry Pi. But first insert the SD card to Raspberry Pi, plug HDMI cable, usb mouse and keyboard. Installation will not take much time compare to NOOBS.
Once Raspbian interface appear, run Terminal and type this code
sudo raspi-configWe will use Raspberry Pi Software Configuration Tool interface to change the configuration easily.
First select Expand Filesystem. This will ensure all the unallocated space in your SD card to be used by Raspberry Pi
Next go to Advance Options >> SSH to enable the SSH server. This will allow you to use Putty to connect and configure Raspberry Pi using and computer.
Finally select Finish to exit and Reboot
After reboot, connect to wifi. This is a backup network in case we can’t access Raspberry Pi through ethernet.
Using Windows computer configuring Raspberry Pi
There are many ways to configure Raspberry pi. The basic one is configuring it directly which is a bit hard. In this tutorial will configure it using Putty. You have three choices to access Raspberry pi with a computer.
- By wifi (Raspi <=wifi=> Router <=wifi=> Computer)
- By Ethernet (Raspi <=cable=> Router <=cable=> Computer)
- Direct Ethernet connection (Raspi <=cable=> Computer)
If you prefer the first two choices you can just skip the following step and proceed to download Putty. Otherwise follow the next step:
Direct Ethernet connection
Connect Raspberry Pi and computer with a Ethernet cable and turn on Raspberry Pi
On computer, go to Network Connections. Ensure your wifi is connected on the internet.
Right click the wifi adapter and select Properties >> Sharing tab and tick the checkbox Allow other network users to connect through this computer….
Download Putty for Raspberry Pi 3
Go to Putty website , download and run the software.
On Host Name, type raspberrypi.local. On Saved Session type the same or any as you like. Click Save and Open.
Login to using the following credentials
Username: pi
Password: raspberry
If you want to add an auto login function every time you want to configure your Raspberry Pi, please check out this article: Raspberry Pi Auto login using SSH
Lets update Raspberry Pi, type the following command:
sudo apt-get updateUpgrade it:
sudo apt-get upgradeReboot:
sudo rebootCongratulation! You just installed Raspbian in a Raspberry Pi
What can you do with your Raspi?