Installing WordPress in Virtualbox using Apache server
What you need:
- Ubuntu 14.04.4 server installed in Virtualbox
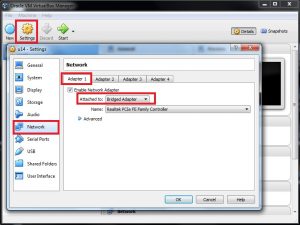
Configuring Access to VirtualBox
Turn off your virtual machine. On Virtualbox goto
Settings >> Network >> Adapter 1 (tab) >> Attached to:
Select : Bridge Adapter
Click Ok and run your Virtual Machine
On the Console, enter the command below to check your IP address:
ip addr showSet static IP address
Change your IP Address:
sudo nano /etc/network/interfacesComment this line by adding # in the begining:
#iface eth0 inet dhcpThe following steps should be based on your network address. In this tutorial I will use my Network Address. My network maybe different from yours. If you have no idea about this, you may study a little about setting up network address. Add the following lines
iface eth0 inet static
address 192.168.2.101
netmask 255.255.255.0
gateway 192.168.2.1
dns-nameservers 192.168.2.1
To save, press ctrl+o and exit ctrl+x
Reboot your VM:
sudo rebootCheck your IP if it applied the setting we did:
ip addr showCheck your IP if it is correct
Install Openssh
Start installing the SSH to your VM
sudo apt-get install openssh-serverYou should be able to use Putty to connect to your Virtual Machine. Run your Putty and enter the following details:
- Host Name: 192.168.2.101
- Saved Sessions: MyDemoVM (any name)
- Click Save and click Open
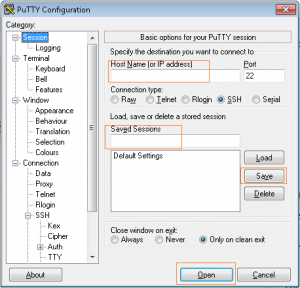
From here we will start using Putty to configure the server.
[Optional] If you want to setup your Putty to login automatically, you should setup the SSH on your Virtual Machine. To do that, you may wish to read the following article: SET SSH PUBLIC KEY AUTHENTICATION
Install LAMP
Once you are logged in using Putty, you can copy paste the codes from this page. You can paste it by simply right clicking your mouse inside Putty.
Lets start installing Apache first, copy the code below and paste it to your Putty:
sudo apt-get install apache2Next is MySQL
sudo apt-get install mysql-serverFinally, install Php
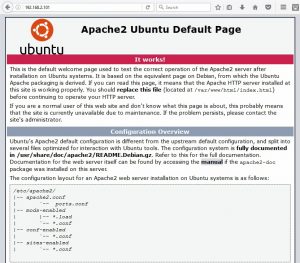
sudo apt-get install php5 libapache2-mod-php5Check Apache if it works. Go to you browser and enter the address of your server, in this tutorial its 192.168.2.101
Check your Php if it works, paste this code in your Putty:
php -r 'echo "\n\nYour PHP is working.\n\n\n";'Configuring SQL
We will create an SQL database that will be used by the wordpress.
Paste this code, this will ask your SQL root password
mysql -u root -pCreate database named: WP
CREATE DATABASE WP;Add user named: User1
CREATE USER User1@localhost;Password is Password1
SET PASSWORD FOR User1@localhost= PASSWORD("Password1");Lastly grant user privilege
GRANT ALL PRIVILEGES ON WP.* TO User1@localhost IDENTIFIED BY 'Password1';Finish it with the following code:
FLUSH PRIVILEGES;
exit
Installing WordPress
Ensure you are in user root directory
cdDownload the latest WordPress
wget http://wordpress.org/latest.tar.gzUnzip the file
tar xzvf latest.tar.gzMake a copy of wp-config.php
cd wordpress
sudo cp wp-config-sample.php wp-config.php
Create directory where we will save the wordpress files
sudo mkdir /var/www/site1Copy the wordpress files
sudo rsync -avP * /var/www/site1/Give the server user access to folder
cd /var/www/site1
sudo chown www-data:www-data * -R
Configuring WordPress
Open WordPress configuration file
sudo nano wp-config.phpNow change the DB_NAME, DB_USER and DB_PASSWORD according to the details below:
/** The name of the database for WordPress */
define('DB_NAME', 'WP');
/** MySQL database username */
define('DB_USER', 'User1');
/** MySQL database password */
define('DB_PASSWORD', 'Password1');
cd /etc/apache2/sites-availablecheck the files on the folder
lsSome apache version has different filename. If you see default.conf that is the one we need to copy. But in my case it shows 000-default.conf
Lets copy the file and save it as site1.conf
sudo cp 000-default.conf site1.confEdit site1.conf
sudo nano site1.confPaste this code:
	ServerAdmin webmaster@localhost
	ServerName 192.168.2.101
	ServerAlias www.site1.com
	DocumentRoot /var/www/site1
	<Directory />
		Options FollowSymLinks
		AllowOverride None
	</Directory>
	<Directory /var/www/site1>
		Options Indexes FollowSymLinks MultiViews
		AllowOverride None
		Order allow,deny
		allow from all
	</Directory>
activate site
sudo a2ensite site1.confreload apache
sudo service apache2 reloadGo to your browerser and type the IP Address: 192.168.2.101
and configure the WordPress.
Troubleshooting
If you have this error: “Your PHP installation appears to be missing the MySQL extension which is required by WordPress” then type this:
sudo apt-get install  php5-mysqlnd-ms
sudo service apache2 reload